


이번에는 Spring Web MVC 에서 Formatter 를 설정하는 방법에 대해 정리 한다.
Formatter 인터페이스에 대한 api 문서를 보면 크게 두 가지 인터페이스를 상속 받고 있다.
Printer<T> 는 T 타입 객체를 문자열로 출력하는 방법에 대해, Parser<T> 는 문자열을 T 타입 객체로 출력하는 방법에 대한 것이다.
프로젝트에서 정리에 사용 할 내용만 남기고 다른 내용은 삭제 했다.

package me.nimkoes;
import org.springframework.web.bind.annotation.GetMapping;
import org.springframework.web.bind.annotation.RestController;
@RestController
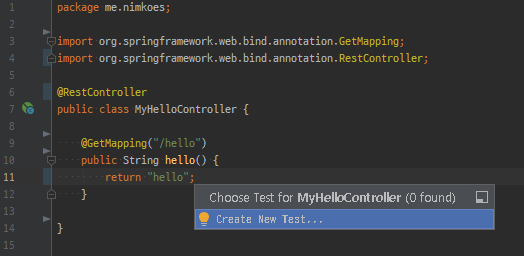
public class MyHelloController {
@GetMapping("/hello")
public String hello() {
return "hello";
}
}
GET 방식의 /hello 요청에 대해 Http Response Body 영역에 "hello" 문자열을 담아 응답하는 handler method 하나만 남기고 모두 삭제 하였다.
이 코드를 테스트 해보기 위해 테스트 코드를 만들었다.
IntelliJ IDEA 기준으로 handler method 영역에 커서를 위치 시키고 ctrl + shift + t 를 누르면 다음과 같이 테스트 코드 파일을 쉽게 만들 수 있다.
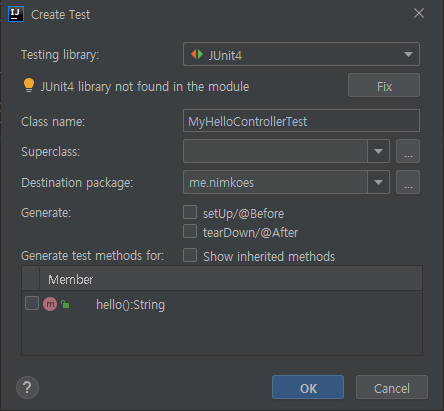
테스트 코드는 JUnit4 를 사용했다.
package me.nimkoes;

import org.junit.Test;
import org.junit.runner.RunWith;
import org.springframework.beans.factory.annotation.Autowired;
import org.springframework.boot.test.autoconfigure.web.servlet.WebMvcTest;
import org.springframework.test.context.junit4.SpringRunner;
import org.springframework.test.web.servlet.MockMvc;

import static org.junit.Assert.*;
import static org.springframework.test.web.servlet.request.MockMvcRequestBuilders.get;
import static org.springframework.test.web.servlet.result.MockMvcResultHandlers.print;
import static org.springframework.test.web.servlet.result.MockMvcResultMatchers.content;

@RunWith(SpringRunner.class)
@WebMvcTest
public class MyHelloControllerTest {

    // @WebMvcTest annotation 을 정의하면 MockMvc 를 주입받을 수 있다.
    @Autowired
    MockMvc mockMvc;

    @Test
    public void hello() throws Exception {
        this.mockMvc.perform(get("/hello"))
            .andDo(print())
            .andExpect(content().string("hello"));
    }

}
| MockHttpServletRequest: HTTP Method = GET Request URI = /hello Parameters = {} Headers = [] Body = null Session Attrs = {} Handler: Type = me.nimkoes.MyHelloController Method = me.nimkoes.MyHelloController#hello() Async: Async started = false Async result = null Resolved Exception: Type = null ModelAndView: View name = null View = null Model = null FlashMap: Attributes = null MockHttpServletResponse: Status = 200 Error message = null Headers = [Content-Type:"text/plain;charset=UTF-8", Content-Length:"5"] Content type = text/plain;charset=UTF-8 Body = hello Forwarded URL = null Redirected URL = null Cookies = [] |
그런데 만약 /hello 가 아닌 /hello/nimkoes 라고 요청을 하면 'hello' 가 아닌 'hello nimkoes' 응답을 원한다고 하자.
    @Test
    public void hello() throws Exception {
        this.mockMvc.perform(get("/hello/nimkoes"))
            .andDo(print())
            .andExpect(content().string("hello nimkoes"));
    }
이 테스트는 무조건 실패한다.
왜냐하면 handler method 를 수정하지 않았기 때문이다.
이 요청을 의도한 대로 처리할 수 있도록 handler method 를 다음과 같이 수정할 수 있다.
package me.nimkoes;

import org.springframework.web.bind.annotation.GetMapping;
import org.springframework.web.bind.annotation.PathVariable;
import org.springframework.web.bind.annotation.RestController;

@RestController
public class MyHelloController {

    @GetMapping("/hello/{name}")
    public String hello(@PathVariable String name) {
        return "hello " + name;
    }

}
@PathVariable annotation 을 사용해서 url path 의 값을 가져와 사용할 수 있다.
handler method 를 위와 같이 수정하면 테스트가 성공하지만 Formatter 를 사용하도록 고쳐보자.
Formatter 는 서두에 설명해 두었지만, 문자열을 객체로, 객체를 문자열로 변환할 수 있는 인터페이스이다.
즉, 문자열인 name 에 대해 다음과 같이 객체로 변환해서 입력받을 수 있다.
package me.nimkoes;

import org.springframework.web.bind.annotation.GetMapping;
import org.springframework.web.bind.annotation.PathVariable;
import org.springframework.web.bind.annotation.RestController;

@RestController
public class MyHelloController {

    @GetMapping("/hello/{name}")
    public String hello(@PathVariable("name") Person person) {
        return "hello " + person.getName();
    }

}
변환에 사용 할 Person 클래스를 정의 한다.
package me.nimkoes;

import lombok.Getter;
import lombok.Setter;

@Getter
@Setter
public class Person {

    String name;

}
현재 이 상태에서는 name 이 Person 타입의 객체에 들어갈 수 없다.
왜냐하면 컴퓨터는 이걸 어떻게 집어 넣어야 하는지 알 수 없기 때문이다.
그래서 Formatter 를 만들어서 어떻게 변환해야 하는지 알려주기 위해 Formatter<Person> 인터페이스를 구현하는 PersonFormatter 클래스를 새로 정의 했다.
package me.nimkoes;

import java.text.ParseException;
import java.util.Locale;
import org.springframework.format.Formatter;

public class PersonFormatter implements Formatter<Person> {

    @Override
    public Person parse(String text, Locale locale) throws ParseException {
        Person person = new Person();
        person.setName(text);
        return person;
    }

    // 현재 사용하고 있지 않지만 임시로 toString 을 반환하도록 구현
    @Override
    public String print(Person object, Locale locale) {
        return object.toString();
    }
}
이렇게 만든 Formatter 를 등록하는 방법은 크게 두 가지가 있다.
하나는 WebMvcConfigurer 를 사용해서 addFormatter 로 추가해 주는 방법과
Spring Boot 를 사용할 경우 bean 으로 등록해서 Formatter 를 자동 등록하는 방법이다.
우선 WebMvcConfigurer 를 사용해서 Formatter 를 등록해 보자.
WebMvcConfigurer 인터페이스를 구현하는 설정 파일을 하나 만들어 준다.
package me.nimkoes;

import org.springframework.context.annotation.Configuration;
import org.springframework.format.FormatterRegistry;
import org.springframework.web.servlet.config.annotation.WebMvcConfigurer;

@Configuration
public class WebConfig implements WebMvcConfigurer {
    @Override
    public void addFormatters(FormatterRegistry registry) {
        registry.addFormatter(new PersonFormatter());
    }
}
addFormatter 에는 Formatter 뿐만 아니라 Converter 도 추가로 등록할 수 있다.

Converter 는 Formatter 보다 일반적인 경우에 사용할 수 있다.
예를 들면 변환 대상이 굳이 문자열이 아니어도 사용할 수 있다. Formatter 에 비해 더 좋아 보이는 듯 해보이기도 하지만 Web 과 관련해서는 문자열을 객체로 변환하는 경우가 더 많기 때문에 Formatter 를 더 많이 사용하게 된다.
Formatter 를 추가했기 때문에 이제는 Spring 은 문자열을 Person 타입의 객체로 어떻게 변환해야 하는지 알게 된다.
다시 한 번 테스트 코드를 실행해보면 이번엔 성공하는 것을 볼 수 있다.
| MockHttpServletRequest: HTTP Method = GET Request URI = /hello/nimkoes Parameters = {} Headers = [] Body = null Session Attrs = {} Handler: Type = me.nimkoes.MyHelloController Method = me.nimkoes.MyHelloController#hello(Person) Async: Async started = false Async result = null Resolved Exception: Type = null ModelAndView: View name = null View = null Model = null FlashMap: Attributes = null MockHttpServletResponse: Status = 200 Error message = null Headers = [Content-Type:"text/plain;charset=UTF-8", Content-Length:"13"] Content type = text/plain;charset=UTF-8 Body = hello nimkoes Forwarded URL = null Redirected URL = null Cookies = [] |
또한 Formatter 는 PathVariable 이 아닌 RequestParam 으로 전달해도 사용 할 수 있다.
RequestParam 은 query string 이라고 생각하면 된다.
테스트 코드의 GET 요청을 query string 을 사용하도록 수정한다.
package me.nimkoes;

import org.junit.Test;
import org.junit.runner.RunWith;
import org.springframework.beans.factory.annotation.Autowired;
import org.springframework.boot.test.autoconfigure.web.servlet.WebMvcTest;
import org.springframework.test.context.junit4.SpringRunner;
import org.springframework.test.web.servlet.MockMvc;

import static org.junit.Assert.*;
import static org.springframework.test.web.servlet.request.MockMvcRequestBuilders.get;
import static org.springframework.test.web.servlet.result.MockMvcResultHandlers.print;
import static org.springframework.test.web.servlet.result.MockMvcResultMatchers.content;

@RunWith(SpringRunner.class)
@WebMvcTest
public class MyHelloControllerTest {

    // @WebMvcTest annotation 을 정의하면 MockMvc 를 주입받을 수 있다.
    @Autowired
    MockMvc mockMvc;

    @Test
    public void hello() throws Exception {
        this.mockMvc.perform(get("/hello")
                .param("name", "nimkoes"))
            .andDo(print())
            .andExpect(content().string("hello nimkoes"));
    }

}
handler method 도 @PathVariable 대신 @RequestParam 을 사용하도록 수정 한다.
package me.nimkoes;

import org.springframework.web.bind.annotation.GetMapping;
import org.springframework.web.bind.annotation.RequestParam;
import org.springframework.web.bind.annotation.RestController;

@RestController
public class MyHelloController {

    @GetMapping("/hello")
    public String hello(@RequestParam("name") Person person) {
        return "hello " + person.getName();
    }

}
| MockHttpServletRequest: HTTP Method = GET Request URI = /hello Parameters = {name=[nimkoes]} Headers = [] Body = null Session Attrs = {} Handler: Type = me.nimkoes.MyHelloController Method = me.nimkoes.MyHelloController#hello(Person) Async: Async started = false Async result = null Resolved Exception: Type = null ModelAndView: View name = null View = null Model = null FlashMap: Attributes = null MockHttpServletResponse: Status = 200 Error message = null Headers = [Content-Type:"text/plain;charset=UTF-8", Content-Length:"13"] Content type = text/plain;charset=UTF-8 Body = hello nimkoes Forwarded URL = null Redirected URL = null Cookies = [] |
의도한 대로 동작했고 테스트도 성공 했다.
마지막으로 Spring Boot 를 사용할 때 Formatter 를 등록할 수 있는 방법을 사용해 본다.
무조건 이렇게 할 필요는 없다. 왜냐면 지금 사용중인 프로젝트도 Spring Boot 프로젝트라는 사실을 잊지 말아야 한다.
Spring Boot 프로젝트면 사용할 수 있는 방법이 하나 더 있을 뿐이다.
이 방법은 Formatter 를 bean 으로 등록하면 자동으로 Formatter 에 등록이 되는 방법이다.
그래서 WebMvcConfigurer 를 구현해서 addFormetter 에 추가해 주지 않아도 된다.
WebConfig 파일을 삭제 해버려도 되지만 내용만 지우기로 했다.
package me.nimkoes;

import org.springframework.context.annotation.Configuration;
import org.springframework.web.servlet.config.annotation.WebMvcConfigurer;

@Configuration
public class WebConfig implements WebMvcConfigurer {
}
그리고 PersonFormatter 를 @Component annotation 을 사용해서 Component Scan 의 대상이 될 수 있도록 하여 bean 으로 등록한다.
package me.nimkoes;

import java.text.ParseException;
import java.util.Locale;
import org.springframework.format.Formatter;
import org.springframework.stereotype.Component;

@Component
public class PersonFormatter implements Formatter<Person> {

    @Override
    public Person parse(String text, Locale locale) throws ParseException {
        Person person = new Person();
        person.setName(text);
        return person;
    }

    // 현재 사용하고 있지 않지만 임시로 toString 을 반환하도록 구현
    @Override
    public String print(Person object, Locale locale) {
        return object.toString();
    }
}
Spring Boot 버전이 올라가면서 구현이 조금 바뀐것 같긴 하지만, bean 으로만 등록 되어 있어도 자동으로 Formatter 로 등록해 주는 부분을 찾아 보았다.
Spring Boot 2.1.1.RELEASE 버전 기준으로 org.springframework.boot:spring-boot-autoconfigure 의 META-INF 하위 spring.factories 파일에 정의 된 자동 설정 중 WebMvcAutoConfiguration 클래스가 있다.
이 클래스는 @ConditionalOnMissingBean({WebMvcConfigurationSupport.class}) 가 정의되어 있다.
이 annotation 의 의미는 WebMvcConfigurationSupport 타입의 bean 이 없으면 자동설정을 한다는 것을 의미한다.
그리고 이 클래스는 @EnableWebMvc annotation 을 작성하면 @Import 하는 DelegatingWebMvcConfiguration.class 클래스가 상속 받은 클래스이다.
정리하면 @EnableWebMvc annotation 을 사용하지 않고 Spring Boot 의 Web 자동 설정을 사용하면 WebMvcAutoconfiguration 클래스를 실행해서 Web 관련 자동 설정을 해준다는 것을 의미한다.
그리고 이 자동 설정 내용 중에 다음 내용이 포함되어 있다.
    @Override
    public void addFormatters(FormatterRegistry registry) {
        for (Converter<?, ?> converter : getBeansOfType(Converter.class)) {
            registry.addConverter(converter);
        }
        for (GenericConverter converter : getBeansOfType(GenericConverter.class)) {
            registry.addConverter(converter);
        }
        for (Formatter<?> formatter : getBeansOfType(Formatter.class)) {
            registry.addFormatter(formatter);
        }
    }

    private <T> Collection<T> getBeansOfType(Class<T> type) {
        return this.beanFactory.getBeansOfType(type).values();
    }
beanFactory 에 등록 된 bean 의 타입 중 Formatter 타입의 bean 을 FormatterRegistry 에 자동으로 추가해주는 부분이다.
이런 내용이 있어서 @Component 로 Formatter<Person> 을 구현 한 PersonFormatter 클래스가 Formatter 로 자동 등록 될 수 있는 것이다.
다시 테스트 코드로 돌아가서 실행해보면 예상과 달리 테스트가 실패 한다.
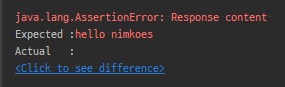
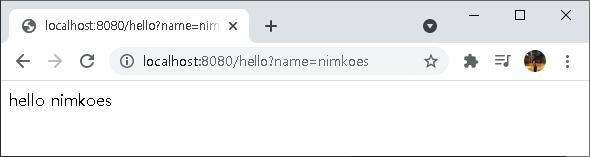
하지만 애플리케이션을 구동해서 브라우저를 통해 실행해보면 의도한 대로 잘 동작하는 것을 확인할 수 있다.
그 이유는 테스트 코드에 @WebMvcTest annotation 을 사용했기 때문이다.
이 annotation 은 slice 테스트를 위한 것으로 Web 과 관련 된 bean 만 등록해서 테스트를 진행 한다.
@Component 는 Web 과 관련 된 bean 으로 인식하지 않기 때문에 의도한 결과를 받아보지 못한 것이다.
slice 테스트 관련된 대표적인 annotation 으로는 @WebMvcTest, @WebFluxTest, @DataJpaTest, @JsonTest, @RestClientTest 등이 있다.
그리고 @WebMvcTest 는 @Controller, @ControllerAdvice, @JsonComponent, Converter, GenericConverter, Filter, WebMvcConfigurer, HandlerMethodArgumentResolver 등에 대해서만 bean 으로 등록 한다.
조금 더 자세한 slice 테스트 관련한 내용을 링크로 남겨 둔다.
그럼 이 테스트는 성공할 수 없는 것일까.
그렇지 않다. slice 테스트를 하지 않으면 된다.
직접 PersonFormatter 를 테스트에 사용 할 bean 이라고 명시해주는 방법도 있지만 모든 bean 을 등록해서 테스트를 진행하도록 수정해 보았다.
@WebMvcTest 대신 @SpringBootTest annotation 을 사용 했고, 이렇게 하면 더이상 MockMvc 에 대한 의존성을 주입받을 수 없기 때문에 @AutoConfigureMockMvc annotation 을 추가로 작성해 주었다.
package me.nimkoes;

import static org.springframework.test.web.servlet.request.MockMvcRequestBuilders.get;
import static org.springframework.test.web.servlet.result.MockMvcResultHandlers.print;
import static org.springframework.test.web.servlet.result.MockMvcResultMatchers.content;
import org.junit.Test;
import org.junit.runner.RunWith;
import org.springframework.beans.factory.annotation.Autowired;
import org.springframework.boot.test.autoconfigure.web.servlet.AutoConfigureMockMvc;
import org.springframework.boot.test.context.SpringBootTest;
import org.springframework.test.context.junit4.SpringRunner;
import org.springframework.test.web.servlet.MockMvc;

@RunWith(SpringRunner.class)
@SpringBootTest
@AutoConfigureMockMvc
public class MyHelloControllerTest {

    // @WebMvcTest annotation 을 정의하면 MockMvc 를 주입받을 수 있다.
    @Autowired
    MockMvc mockMvc;

    @Test
    public void hello() throws Exception {
        this.mockMvc.perform(get("/hello")
                .param("name", "nimkoes"))
            .andDo(print())
            .andExpect(content().string("hello nimkoes"));
    }

}
| MockHttpServletRequest: HTTP Method = GET Request URI = /hello Parameters = {name=[nimkoes]} Headers = {} Body = null Session Attrs = {} Handler: Type = me.nimkoes.MyHelloController Method = public java.lang.String me.nimkoes.MyHelloController.hello(me.nimkoes.Person) Async: Async started = false Async result = null Resolved Exception: Type = null ModelAndView: View name = null View = null Model = null FlashMap: Attributes = null MockHttpServletResponse: Status = 200 Error message = null Headers = {Content-Type=[text/plain;charset=UTF-8], Content-Length=[13]} Content type = text/plain;charset=UTF-8 Body = hello nimkoes Forwarded URL = null Redirected URL = null Cookies = [] |
모든 bean 을 등록 했기 때문에 @Component annoation 에 대해서도 bean 으로 등록 되었고, @EnableWebMvc 를 사용하지 않은 Spring Boot 자동 설정 내용을 기준으로 PersonFormatter 를 FormatterRegistry 에 등록해 주어 정상적으로 테스트가 성공하는 것을 확인할 수 있다.
'시리즈 > Spring Web MVC' 카테고리의 다른 글
| 2.5 리소스 핸들러 (default Servlet) (1) | 2021.07.08 |
|---|---|
| 2.4 핸들러 인터셉터 (HandlerInterceptor interface) (0) | 2021.07.07 |
| 2.2 Spring Boot 의 Spring MVC 설정 (war 배포) (0) | 2021.07.05 |
| 2.1 Spring Web MVC 설정 @EnableWebMvc, WebMvcConfigurer (0) | 2021.07.04 |
| 1.5 Spring MVC 동작 원리 마무리 (0) | 2021.06.28 |