HTTP 메시지 컨버터 (이하 메시지 컨버터) 에 대해 정리한다.
메시지 컨버터 역시 WebMvcConfigurer 를 통해 설정할 수 있다.
우선 메시지 컨버터는 HTTP request body 또는 response body 에 담긴 데이터를 원하는 형태로 변환하여 사용할 수 있는 기능이다.
MVC 에서 Controller 역할을 하는 handler method 가 요청 정보를 읽을 때는 @RequestBody annotation 을 사용하고, 응답 정보를 보낼 때는 @ResponseBody annotation 을 사용한다.
앞서 만들었던 MyHelloController 에 HTTP Get 요청을 처리할 수 있는 handler method 를 하나 추가했다.
package me.nimkoes;
import org.springframework.web.bind.annotation.GetMapping;
import org.springframework.web.bind.annotation.RequestBody;
import org.springframework.web.bind.annotation.RequestParam;
import org.springframework.web.bind.annotation.RestController;
@RestController
public class MyHelloController {
@GetMapping("/hello")
public String hello(@RequestParam("name") Person person) {
System.out.println("handler method execute !!");
return "hello " + person.getName();
}
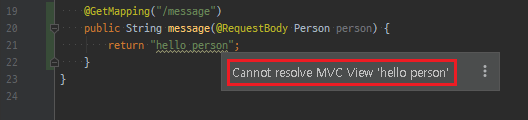
@GetMapping("/message")
public String message(@RequestBody Person person) {
return "hello person";
}
}
아래쪽에 HTTP GET 방식의 /message 요청을 처리할 수 있는 handler method 를 하나 추가했는데,
@RequestBody annotation 을 사용해서 HTTP request body 의 데이터를 Person 타입의 객체로 변환하도록 했다.
그리고 @ResponseBody annotation 을 사용해서 "hello person" 을 응답 데이터 본문에 실어야 하는데 사용하지 않았다.
그 이유는 MyHelloController 클래스에 @RestController annotation 을 작성했기 때문이다.
이 annotation 을 Controller 역할을 하는 class 에 붙여주면 이 안에 정의한 handler method 는 모두 @ResponseBody annotation 을 작성한 것과 같은 효과를 가진다.
실제로 @RestController annotation 이 어떻게 구현되어 있는지 보면 @ResponseBody annotation 이 붙어있는 것을 볼 수 있다.
/*
 * Copyright 2002-2017 the original author or authors.
 *
 * Licensed under the Apache License, Version 2.0 (the "License");
 * you may not use this file except in compliance with the License.
 * You may obtain a copy of the License at
 *
 *      http://www.apache.org/licenses/LICENSE-2.0
 *
 * Unless required by applicable law or agreed to in writing, software
 * distributed under the License is distributed on an "AS IS" BASIS,
 * WITHOUT WARRANTIES OR CONDITIONS OF ANY KIND, either express or implied.
 * See the License for the specific language governing permissions and
 * limitations under the License.
 */

package org.springframework.web.bind.annotation;

import java.lang.annotation.Documented;
import java.lang.annotation.ElementType;
import java.lang.annotation.Retention;
import java.lang.annotation.RetentionPolicy;
import java.lang.annotation.Target;

import org.springframework.core.annotation.AliasFor;
import org.springframework.stereotype.Controller;

/**
 * A convenience annotation that is itself annotated with
 * {@link Controller @Controller} and {@link ResponseBody @ResponseBody}.
 * <p>
 * Types that carry this annotation are treated as controllers where
 * {@link RequestMapping @RequestMapping} methods assume
 * {@link ResponseBody @ResponseBody} semantics by default.
 *
 * <p><b>NOTE:</b> {@code @RestController} is processed if an appropriate
 * {@code HandlerMapping}-{@code HandlerAdapter} pair is configured such as the
 * {@code RequestMappingHandlerMapping}-{@code RequestMappingHandlerAdapter}
 * pair which are the default in the MVC Java config and the MVC namespace.
 *
 * @author Rossen Stoyanchev
 * @author Sam Brannen
 * @since 4.0
 */
@Target(ElementType.TYPE)
@Retention(RetentionPolicy.RUNTIME)
@Documented
@Controller
@ResponseBody
public @interface RestController {

	/**
	 * The value may indicate a suggestion for a logical component name,
	 * to be turned into a Spring bean in case of an autodetected component.
	 * @return the suggested component name, if any (or empty String otherwise)
	 * @since 4.0.1
	 */
	@AliasFor(annotation = Controller.class)
	String value() default "";

}
@RestController 는 @ResponseBody 도 있지만 @Controller 타입이기도 한 것을 확인할 수 있다.
만약 @RestController 를 사용하지 않고 그냥 @Controller 를 사용했다면, 다음과 같이 응답 결과를 HTTP response body 영역에 실어 보내야 하는 handler method 에 대해 @ResponseBody annotation 을 명시해 주어야 한다.
그렇지 않고 String 타입의 값을 반환하려 한다면 우선 그 문자열에 매칭되는 View 반환을 시도하게 되어 원하는 결과를 받아볼 수 없을 수 있다.
package me.nimkoes;

import org.springframework.stereotype.Controller;
import org.springframework.web.bind.annotation.GetMapping;
import org.springframework.web.bind.annotation.RequestBody;
import org.springframework.web.bind.annotation.RequestParam;
import org.springframework.web.bind.annotation.ResponseBody;

@Controller
public class MyHelloController {

    @GetMapping("/hello")
    @ResponseBody
    public String hello(@RequestParam("name") Person person) {
        System.out.println("handler method execute !!");
        return "hello " + person.getName();
    }

    @GetMapping("/message")
    @ResponseBody
    public String message(@RequestBody Person person) {
        return "hello person";
    }
}
테스트 해보기 위해 @ResponseBody 를 제거 하자마자 똑똑한 IDEA 가 일치하는 View 가 없다고 경고를 보여주고 있다.
실제로 요청을 보낸 결과 다음과 같이 500 에러를 받았다.
{
    "timestamp": "2021-07-08T12:45:00.765+0000",
    "status": 500,
    "error": "Internal Server Error",
    "message": "Error resolving template [hello person], template might not exist or might not be accessible by any of the configured Template Resolvers",
    "path": "/message"
}
서버에서도 TemplateEngine 쪽에서 오류가 발생한걸 볼 수 있었다.
| 2021-07-08 21:45:00.763 ERROR 16036 --- [io-8080-exec-10] org.thymeleaf.TemplateEngine : [THYMELEAF][http-nio-8080-exec-10] Exception processing template "hello person": Error resolving template [hello person], template might not exist or might not be accessible by any of the configured Template Resolvers |
Spring 에는 따로 등록하지 않아도 기본적으로 제공해주는 메시지 컨버터가 있다.
- 바이트 배열 컨버터
- 문자열 컨버터
- Resource 컨버터
- Form 컨버터 (html form data 를 map 형태로 변환)
메시지 컨버터를 등록해서 사용하는 방법은 WebMvcConfigurer 인터페이스를 구현한다는 것은 동일하지만
1. configureMessageConverters 메소드를 재정의 하거나
2. extendMessageConverters 메소드를 재정의 하는
두 가지 방법이 있다.
이 두 방법은 차이가 있는데 configurerMessageConverters 를 재정의하면 자동 등록 된 메시지 컨버터를 무시하고 이곳에 등록한 메시지 컨버터만 사용 한다는 것을 의미하고, extendMessageConverters 를 재정의하면 자동 등록 된 메시지 컨버터에 더해서 메시지 컨버터가 추가 된다는 점이다.
    /**
     * Configure the {@link HttpMessageConverter HttpMessageConverters} to use for reading or writing
     * to the body of the request or response. If no converters are added, a
     * default list of converters is registered.
     * <p><strong>Note</strong> that adding converters to the list, turns off
     * default converter registration. To simply add a converter without impacting
     * default registration, consider using the method
     * {@link #extendMessageConverters(java.util.List)} instead.
     * @param converters initially an empty list of converters
     */
    default void configureMessageConverters(List<HttpMessageConverter<?>> converters) {
    }

     /**
     * A hook for extending or modifying the list of converters after it has been
     * configured. This may be useful for example to allow default converters to
     * be registered and then insert a custom converter through this method.
     * @param converters the list of configured converters to extend.
     * @since 4.1.3
     */
    default void extendMessageConverters(List<HttpMessageConverter<?>> converters) {
    }
하지만 사실 이렇게 직접 메시지 컨버터를 추가하는 일도 흔한 경우는 아니다.
왜냐하면 그 외 일반적으로 많이 사용하는 JAXB2, Jackson2, Jackson, Gson, Atom, RSS 등 메시지 컨버터는 pom.xml 에 depondency 로 해당 의존성이 추가되어 있는 경우 자동으로 등록 되기 때문이다.
다시 말해서 classpath 에 이 라이브러리가 존재 한다면 자동으로 등록 되어 사용할 수 있다는 것을 뜻한다.
classpath 에 라이브러리가 있으면, pom.xml 에 dependency 로 의존성만 추가가 되어있으면 자동으로 메시지 컨버터를 등록해주는 곳은 WebMvcConfigurationSupport 에 구현되어 있다.
WebMvcConfigurationSupport 클래스는 Spring Boot 가 아닌 Spring Web MVC 에서 제공하는 기능이다.
이 클래스 파일에서 관련된 주요한 내용만 추려 보았다.
// 생략...

public class WebMvcConfigurationSupport implements ApplicationContextAware, ServletContextAware {

    // 생략..

    static {
        ClassLoader classLoader = WebMvcConfigurationSupport.class.getClassLoader();
        romePresent = ClassUtils.isPresent("com.rometools.rome.feed.WireFeed", classLoader);
        jaxb2Present = ClassUtils.isPresent("javax.xml.bind.Binder", classLoader);
        jackson2Present = ClassUtils.isPresent("com.fasterxml.jackson.databind.ObjectMapper", classLoader) &&
                ClassUtils.isPresent("com.fasterxml.jackson.core.JsonGenerator", classLoader);
        jackson2XmlPresent = ClassUtils.isPresent("com.fasterxml.jackson.dataformat.xml.XmlMapper", classLoader);
        jackson2SmilePresent = ClassUtils.isPresent("com.fasterxml.jackson.dataformat.smile.SmileFactory", classLoader);
        jackson2CborPresent = ClassUtils.isPresent("com.fasterxml.jackson.dataformat.cbor.CBORFactory", classLoader);
        gsonPresent = ClassUtils.isPresent("com.google.gson.Gson", classLoader);
        jsonbPresent = ClassUtils.isPresent("javax.json.bind.Jsonb", classLoader);
        kotlinSerializationJsonPresent = ClassUtils.isPresent("kotlinx.serialization.json.Json", classLoader);
    }

    // 생략..

    /**
     * Adds a set of default HttpMessageConverter instances to the given list.
     * Subclasses can call this method from {@link #configureMessageConverters}.
     * @param messageConverters the list to add the default message converters to
     */
    protected final void addDefaultHttpMessageConverters(List<HttpMessageConverter<?>> messageConverters) {
        messageConverters.add(new ByteArrayHttpMessageConverter());
        messageConverters.add(new StringHttpMessageConverter());
        messageConverters.add(new ResourceHttpMessageConverter());
        messageConverters.add(new ResourceRegionHttpMessageConverter());
        if (!shouldIgnoreXml) {
            try {
                messageConverters.add(new SourceHttpMessageConverter<>());
            }
            catch (Throwable ex) {
                // Ignore when no TransformerFactory implementation is available...
            }
        }
        messageConverters.add(new AllEncompassingFormHttpMessageConverter());

        if (romePresent) {
            messageConverters.add(new AtomFeedHttpMessageConverter());
            messageConverters.add(new RssChannelHttpMessageConverter());
        }

        if (!shouldIgnoreXml) {
            if (jackson2XmlPresent) {
                Jackson2ObjectMapperBuilder builder = Jackson2ObjectMapperBuilder.xml();
                if (this.applicationContext != null) {
                    builder.applicationContext(this.applicationContext);
                }
                messageConverters.add(new MappingJackson2XmlHttpMessageConverter(builder.build()));
            }
            else if (jaxb2Present) {
                messageConverters.add(new Jaxb2RootElementHttpMessageConverter());
            }
        }

        if (kotlinSerializationJsonPresent) {
            messageConverters.add(new KotlinSerializationJsonHttpMessageConverter());
        }
        if (jackson2Present) {
            Jackson2ObjectMapperBuilder builder = Jackson2ObjectMapperBuilder.json();
            if (this.applicationContext != null) {
                builder.applicationContext(this.applicationContext);
            }
            messageConverters.add(new MappingJackson2HttpMessageConverter(builder.build()));
        }
        else if (gsonPresent) {
            messageConverters.add(new GsonHttpMessageConverter());
        }
        else if (jsonbPresent) {
            messageConverters.add(new JsonbHttpMessageConverter());
        }

        if (jackson2SmilePresent) {
            Jackson2ObjectMapperBuilder builder = Jackson2ObjectMapperBuilder.smile();
            if (this.applicationContext != null) {
                builder.applicationContext(this.applicationContext);
            }
            messageConverters.add(new MappingJackson2SmileHttpMessageConverter(builder.build()));
        }
        if (jackson2CborPresent) {
            Jackson2ObjectMapperBuilder builder = Jackson2ObjectMapperBuilder.cbor();
            if (this.applicationContext != null) {
                builder.applicationContext(this.applicationContext);
            }
            messageConverters.add(new MappingJackson2CborHttpMessageConverter(builder.build()));
        }
    }

    // 생략..

}
위에 언급한 기본 제공하는 메시지 컨버터들은 Spring 뿐만 아니라 Spring Boot 에서도 동일하게 적용 된다.
Spring Boot 관련해서 내용을 추가 하자면 Spring Boot 는 spring-boot-starter-web 을 통해 spring-boot-starter-json 이 의존성으로 추가 되고, 이 starter json 이 Jackson2 를 가져오도록 되어 있다.
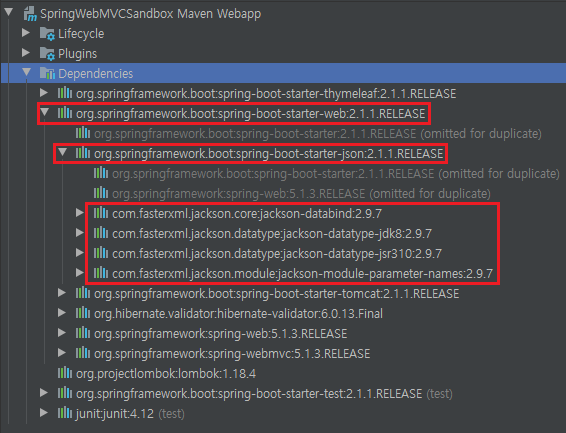
그래서 Spring Boot 를 쓰면 별도의 메시지 컨버터를 등록하거나 dependency 에 의존성 추가 없이 json 형태의 데이터를 위한 메시지 컨버터를 바로 사용할 수 있다.
실제로 메시지 컨버터를 사용하는 예제를 만들어 본다.
앞서 만들었던 /message handler method 를 다음과 같이 수정하여 문자열 데이터를 잘 처리하는지 확인해보자.
package me.nimkoes;

import org.springframework.web.bind.annotation.GetMapping;
import org.springframework.web.bind.annotation.RequestBody;
import org.springframework.web.bind.annotation.RequestParam;
import org.springframework.web.bind.annotation.RestController;

@RestController
public class MyHelloController {

    @GetMapping("/hello")
    public String hello(@RequestParam("name") Person person) {
        System.out.println("handler method execute !!");
        return "hello " + person.getName();
    }

    @GetMapping("/message")
    public String message(@RequestBody String body) {
        return "Hello, " + body;
    }
}
HTTP request body 에 문자열을 전달 받은 내용을 사용해서 response body 에 담아 보내는 handler mothod 로 수정했다.
그리고 다음과 같이 테스트 코드를 작성하고 실행해 보았다.
    @Test
    public void stringMessage() throws Exception {
        this.mockMvc.perform(get("/message").content("nimkoes"))
            .andDo(print())
            .andExpect(status().isOk())
            .andExpect(content().string("Hello, nimkoes"));
    }
| MockHttpServletRequest: HTTP Method = GET Request URI = /message Parameters = {} Headers = {} Body = nimkoes Session Attrs = {} Handler: Type = me.nimkoes.MyHelloController Method = public java.lang.String me.nimkoes.MyHelloController.message(java.lang.String) Async: Async started = false Async result = null Resolved Exception: Type = null ModelAndView: View name = null View = null Model = null FlashMap: Attributes = null MockHttpServletResponse: Status = 200 Error message = null Headers = {Content-Type=[text/plain;charset=UTF-8], Content-Length=[14]} Content type = text/plain;charset=UTF-8 Body = Hello, nimkoes Forwarded URL = null Redirected URL = null Cookies = [] |
의도한 대로 잘 동작하는 것을 확인할 수 있었다.
그럼 한가지 의문이 생기는데, request 와 response 에 대해 어떤 형태의 데이터를 원하는지 어떻게 알 수 있을까.
결론부터 얘기하면 HTTP 의 header 정보를 참고하여 어떤 형태의 데이터가 요청 본문에 들어오고, 이 요청은 어떤 형태의 데이터를 응답 본문에 담아야 할지 결정한다.
HTTP header 정보를 사용하여 json 형태의 데이터를 객체로 변환하고, 변환 된 객체 정보를 json 형태로 응답 하는 handler method 를 만들어 보았다.
    @GetMapping("/jsonMessage")
    public Person jsonMessage(@RequestBody Person person) {
        System.out.println(person.getName());
        person.setName("My name is " + person.getName());
        return person;
    }
이 handler 는 json 형식으로 된 데이터를 HTTP request body 에 담아 보내면,
Person 타입으로 변환해서 person 객체에 담고, 이 객체를 다시 json 형식으로 변환하여 HTTP response body 에 담아 보내도록 할 것이다.
정상적으로 동작하는지 확인하기 위한 테스트 코드를 작성했다.
package me.nimkoes;

import static org.springframework.test.web.servlet.request.MockMvcRequestBuilders.get;
import static org.springframework.test.web.servlet.result.MockMvcResultHandlers.print;
import static org.springframework.test.web.servlet.result.MockMvcResultMatchers.*;
import com.fasterxml.jackson.databind.ObjectMapper;
import org.hamcrest.Matchers;
import org.junit.Test;
import org.junit.runner.RunWith;
import org.springframework.beans.factory.annotation.Autowired;
import org.springframework.boot.test.autoconfigure.web.servlet.AutoConfigureMockMvc;
import org.springframework.boot.test.context.SpringBootTest;
import org.springframework.http.HttpHeaders;
import org.springframework.http.MediaType;
import org.springframework.test.context.junit4.SpringRunner;
import org.springframework.test.web.servlet.MockMvc;

@RunWith(SpringRunner.class)
@SpringBootTest
@AutoConfigureMockMvc
public class MyHelloControllerTest {

    // @WebMvcTest annotation 을 정의하면 MockMvc 를 주입받을 수 있다.
    @Autowired
    MockMvc mockMvc;

    // Spring Boot 를 사용하여 기본적으로 등록 된 bean 중 Jackson 이 제공하는 ObjectMapper 를 사용
    @Autowired
    ObjectMapper objectMapper;

    @Test
    public void jsonMessage() throws Exception {

        Person person = new Person();
        person.setName("nimkoes");

        // 객체를 json 문자열로 변환
        String jsonString = objectMapper.writeValueAsString(person);

        this.mockMvc.perform(get("/jsonMessage")
                .contentType(MediaType.APPLICATION_JSON_UTF8)  // context type 을 사용하여 request 데이터가 json 형식임을 알려줌
                .accept(MediaType.APPLICATION_JSON_UTF8)       // accept 를 사용하여 response 데이터가 json 형식이기를 바란다고 알려줌
                .content(jsonString))                          // request body 에 jsonString 입력
            .andDo(print())
            .andExpect(status().isOk())
            .andExpect(jsonPath("$.name").value("My name is nimkoes"));
    }
}
| MockHttpServletRequest: HTTP Method = GET Request URI = /jsonMessage Parameters = {} Headers = {Content-Type=[application/json;charset=UTF-8], Accept=[application/json;charset=UTF-8]} Body = {"name":"nimkoes"} Session Attrs = {} Handler: Type = me.nimkoes.MyHelloController Method = public me.nimkoes.Person me.nimkoes.MyHelloController.jsonMessage(me.nimkoes.Person) Async: Async started = false Async result = null Resolved Exception: Type = null ModelAndView: View name = null View = null Model = null FlashMap: Attributes = null MockHttpServletResponse: Status = 200 Error message = null Headers = {Content-Type=[application/json;charset=UTF-8]} Content type = application/json;charset=UTF-8 Body = {"name":"My name is nimkoes"} Forwarded URL = null Redirected URL = null Cookies = [] |
의도한 대로 동작하는 것을 확인할 수 있었다.
테스트 코드에 사용한 jsonPath 에 대한 내용은 다음 두 링크를 통해 확인할 수 있다.
2. JSONPath Online Evaluator 링크
다음으로 xml 형식의 데이터로 실습을 해보려 한다.
json 이전에는 xml 형식의 데이터도 많이 사용했던 것으로 기억 한다. 그렇다고 요즘 xml 형식을 사용하지 않는 것은 아니지만 json 이 나온 이후로 꽤 많이 줄어든 것으로 알고 있다.
아무튼,
Spring Boot 를 사용하고 있기 때문에 json 의 경우 dependency 를 추가 할 필요가 없었다.
하지만 xml 형식의 데이터를 사용하려면 pom.xml 에 dependency 를 추가해 줘야 한다.
그나마 다행인건 의존성만 추가하면 알아서 메시지 컨버터로 등록 해주기 때문에 직접 등록해주는 일은 하지 않아도 된다는 것이다.
        <!-- jaxb interface -->
        <dependency>
            <groupId>javax.xml.bind</groupId>
            <artifactId>jaxb-api</artifactId>
        </dependency>

        <!-- jaxb 구현체체 -->
       <dependency>
            <groupId>org.glassfish.jaxb</groupId>
            <artifactId>jaxb-runtime</artifactId>
        </dependency>

        <!--  Object Xml Mapping / marshalling, unmarshalling -->
        <dependency>
            <groupId>org.springframework</groupId>
            <artifactId>spring-oxm</artifactId>
            <version>${spring-framework.version}</version>
        </dependency>
의존성을 추가 했으니 Spring oxm 이 제공하는 marshaller 를 bean 으로 등록 한다.
현재 사용중인 WebMvcConfigurer 를 구현하고 있는 설정파일인 WebConfig 파일에 등록 했다.
package me.nimkoes;

import java.util.concurrent.TimeUnit;
import org.springframework.context.annotation.Bean;
import org.springframework.context.annotation.Configuration;
import org.springframework.http.CacheControl;
import org.springframework.oxm.jaxb.Jaxb2Marshaller;
import org.springframework.web.servlet.config.annotation.InterceptorRegistry;
import org.springframework.web.servlet.config.annotation.ResourceHandlerRegistry;
import org.springframework.web.servlet.config.annotation.WebMvcConfigurer;

@Configuration
public class WebConfig implements WebMvcConfigurer {

    @Bean
    public Jaxb2Marshaller jaxb2Marshaller() {
        Jaxb2Marshaller jaxb2Marshaller = new Jaxb2Marshaller();

        // jaxb 에서 사용하는 @XmlRootElement annotation 의 위치를 알려줘야 변환이 가능하다.
        jaxb2Marshaller.setPackagesToScan(Person.class.getPackage().getName());
        return jaxb2Marshaller;
    }

    @Override
    public void addInterceptors(InterceptorRegistry registry) {
        registry.addInterceptor(new GreetingInterceptor())
            .addPathPatterns("/hi")
            .order(0);
        registry.addInterceptor(new AnotherInterceptor()).order(-1);
    }

    @Override
    public void addResourceHandlers(ResourceHandlerRegistry registry) {
        registry.addResourceHandler("/m/**")            // 어떤 패턴의 요청을 처리할지 정의
            .addResourceLocations("classpath:/m/", "file:/Users/nimkoes/files/", "/myStatic/")  // 리소스를 찾을 위치
            .setCacheControl(CacheControl.maxAge(10, TimeUnit.MINUTES));  // 리소스가 변경되지 않은 동안 캐싱을 유지할 시간
    }
}
Jaxb2Marshaller 를 등록한 내용 중에 @XmlRootElement annotation 에 대해서는 다음에 내용을 추가하겠다.
그리고 Person 클래스에 @XmlRootElement annotation 을 작성해 주었다.
package me.nimkoes;

import javax.xml.bind.annotation.XmlRootElement;
import lombok.Getter;
import lombok.Setter;

@Getter
@Setter
@XmlRootElement
public class Person {

    String name;

}
이번에 xml 데이터를 주고 받는 테스트를 해보기 위해 별도의 handler method 를 사용하지 않고, 앞서 json 테스트를 해보기 위해 만들었던 /jsonMessage handler method 를 재사용 하려 한다.
똑같은 handler method 이지만 header 정보와 body 영역의 데이터 형식에 따라 똑같은 요청에 대해 어떻게 결과가 달라지는지 확인해 볼 수 있다.
package me.nimkoes;

import static org.springframework.test.web.servlet.request.MockMvcRequestBuilders.get;
import static org.springframework.test.web.servlet.result.MockMvcResultHandlers.print;
import static org.springframework.test.web.servlet.result.MockMvcResultMatchers.*;
import com.fasterxml.jackson.databind.ObjectMapper;
import java.io.StringWriter;
import javax.xml.transform.Result;
import javax.xml.transform.stream.StreamResult;
import org.hamcrest.Matchers;
import org.junit.Test;
import org.junit.runner.RunWith;
import org.springframework.beans.factory.annotation.Autowired;
import org.springframework.boot.test.autoconfigure.web.servlet.AutoConfigureMockMvc;
import org.springframework.boot.test.context.SpringBootTest;
import org.springframework.http.HttpHeaders;
import org.springframework.http.MediaType;
import org.springframework.oxm.Marshaller;
import org.springframework.test.context.junit4.SpringRunner;
import org.springframework.test.web.servlet.MockMvc;

@RunWith(SpringRunner.class)
@SpringBootTest
@AutoConfigureMockMvc
public class MyHelloControllerTest {

    // @WebMvcTest annotation 을 정의하면 MockMvc 를 주입받을 수 있다.
    @Autowired
    MockMvc mockMvc;

    @Autowired
    Marshaller marshaller;

    @Test
    public void xmlMessage() throws Exception {

        Person person = new Person();
        person.setName("nimkoes");

        // 객체를 xml 문자열로 변환
        StringWriter stringWriter = new StringWriter();
        Result result = new StreamResult(stringWriter);
        marshaller.marshal(person, result);

        String xmlString = stringWriter.toString();


        this.mockMvc.perform(get("/jsonMessage")
                .contentType(MediaType.APPLICATION_XML)  // context type 을 사용하여 request 데이터가 xml 형식임을 알려줌
                .accept(MediaType.APPLICATION_XML)       // accept 를 사용하여 response 데이터가 xml 형식이기를 바란다고 알려줌
                .content(xmlString))                     // request body 에 xmlString 입력
            .andDo(print())
            .andExpect(status().isOk())
            .andExpect(xpath("person/name").string("My name is nimkoes"));
    }
}
다른 테스트 코드는 삭제하고 xml 메시지 컨버터를 테스트 할 테스트 코드만 남겨 두었다.
Marshaller 타입의 객체를 주입 받으면, dependency 에 등록한 spring oxm 의 실제 구현체로 등록한 bean 인 Jaxb2Marshaller 객체가 들어온다.
그리고 이 구현체를 가지고 Person 타입 객체를 문자열로 만드는데 사용했다.
| MockHttpServletRequest: HTTP Method = GET Request URI = /jsonMessage Parameters = {} Headers = {Content-Type=[application/xml;charset=UTF-8], Accept=[application/xml]} Body = <?xml version="1.0" encoding="UTF-8" standalone="yes"?><person><name>nimkoes</name></person> Session Attrs = {} Handler: Type = me.nimkoes.MyHelloController Method = public me.nimkoes.Person me.nimkoes.MyHelloController.jsonMessage(me.nimkoes.Person) Async: Async started = false Async result = null Resolved Exception: Type = null ModelAndView: View name = null View = null Model = null FlashMap: Attributes = null MockHttpServletResponse: Status = 200 Error message = null Headers = {Content-Type=[application/xml]} Content type = application/xml Body = <?xml version="1.0" encoding="UTF-8" standalone="yes"?><person><name>My name is nimkoes</name></person> Forwarded URL = null Redirected URL = null Cookies = [] |
똑같은 handler method 를 사용 했지만 header 의 context type 과 accept 정보에 따라 사용 된 메시지 컨버터가 달라지고, 요청 응답 데이터도 원하는 형식으로 쉽게 바꿔 사용할 수 있었다.
테스트 코드에 사용한 xpath 에 대한 내용은 다음 두 링크를 통해 확인할 수 있다.
xml 을 사용했을 때 json 때보다 조금 불편하긴 하지만 공통으로 사용 할 수 있도록 만들어두면 그리 불편하지 않을 것 같다.
'Archive > Spring Web MVC' 카테고리의 다른 글
| 3.2 핸들러 메소드 : argument & return value (overview, 처리 구현체 자동 등록) (0) | 2021.07.12 |
|---|---|
| 3.1 요청 매핑하기 (handler method) (1) | 2021.07.11 |
| 2.5 리소스 핸들러 (default Servlet) (1) | 2021.07.08 |
| 2.4 핸들러 인터셉터 (HandlerInterceptor interface) (0) | 2021.07.07 |
| 2.3 Spring Web MVC 의 Formatter (Spring Boot 자동 설정) (0) | 2021.07.06 |